Hot Dog Bar

 
HotDog_Bar_v2_01.jpg

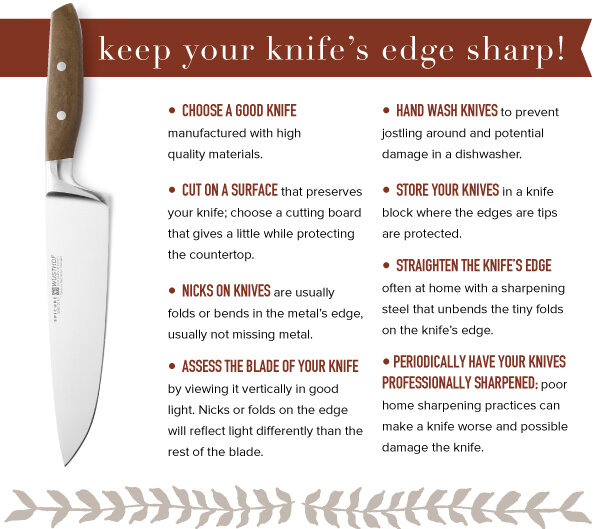
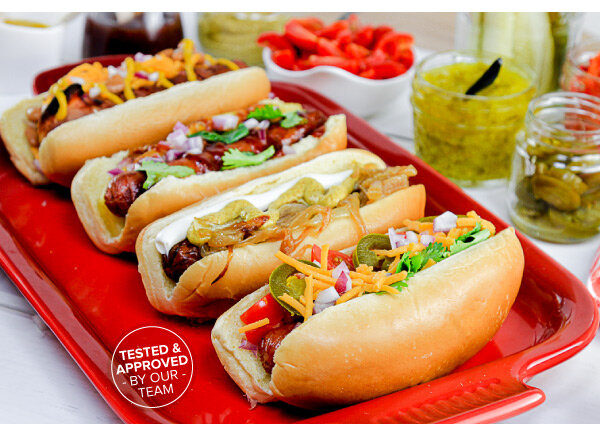
A hot dog is a fine thing, BUT, a bacon-wrapped hot dog paired with a packed hot dog bar is an experience that’s anything but ordinary. Fire up the grill! There’s an entire summer season ahead — and you’ve got some serious eating to do!

Summertime Hot Dog Bar
Serves 4

Basic Ingredients:
8 hot dog buns
8 all beef hot dogs
8 pieces thin-sliced bacon
16 toothpicks, (soaked for 30 minutes)

Optional Condiments:
Ketchup
Yellow Mustard
Spicy Brown Mustard
Cream Cheese
BBQ Sauce Hot Sauce

Optional Toppings:
Dill or Sweet Relish Onions, caramelized
Spicy Marinated Peppers
Jalapeño Peppers
Pineapple Spears
Red Onion, diced
Baked Beans or Chili Beans
Cheddar Cheese
Pickle Spears

Directions:
1. Soak toothpicks in water for 30 minutes before grilling.

2. Wrap the hot dogs with a slice of thin-sliced bacon. Secure the bacon on each end with a soaked toothpick.

3. Grill the bacon-wrapped hot dogs on a well-oiled grill over medium heat. Turn the dogs as needed to cook the bacon until it’s crispy on all sides. The bacon will take longer to grill than a plain dog, so plan on watching and turning the dogs carefully until the bacon is cooked evenly on all sides.

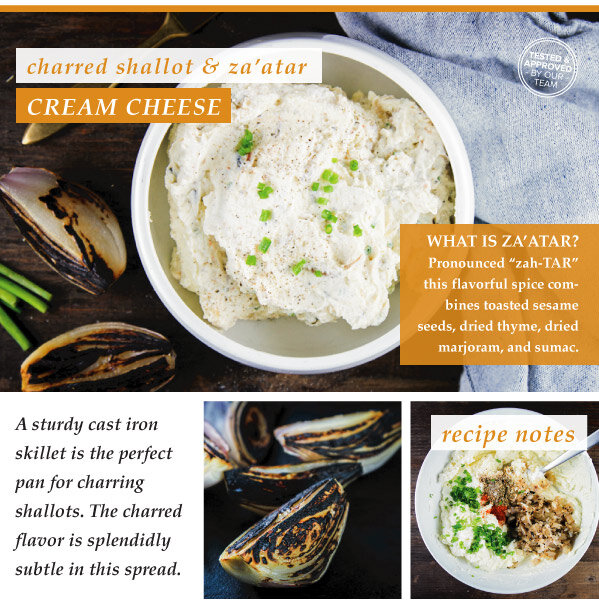
4. Once you’ve flipped the hot dogs and the bacon has cooked on the top and bottom, the bacon should be secure enough around the hot dog to remove the toothpicks. Carefully remove the toothpicks and grill the other two sides until the bacon is fully crispy on all sides. Get creative with the toppings! Two of our favorite hot dog toppings are caramelized onions paired with a thick stripe of cream cheese. From there, go with the other condiments as desired. The cream cheese, not a common hot dog addition, is nicely decadent -- try it, you might love it, too!

Try one of these tasty combos, or make up your own signature hot dog:
West Coast Vibes: Cream Cheese + Caramelized Onions + Spicy Brown Mustard + Pickled Hot Peppers
Cowboy Dog: Bacon-wrapped dog with Baked Beans + Cheddar Cheese + Mustard + Red Onions
Island Style: Pineapple Spear + Cilantro + Red Onion + BBQ Sauce
Taco Time: Tomatoes + Cilantro + Cheddar Cheese + Pickled Jalapeño Slices + Hot Sauce
Classic Dog: Relish + Ketchup + Mustard


Fiesta Chop Salad

 
FiestaChop2021_v3_01.jpg

This Fiesta Chop Salad is packed with goodies! Start with the fresh crunch of chilly iceberg lettuce, then add cheese, chili beans, red onions, tomatoes, grilled corn, AND corn chips! The creamy, tangy cilantro dressing ties it all together. Enjoy all the fresh, delicious flavors – your taste buds will be doing a happy dance!

Fiesta Chop Salad
Serves 6 - 8

Creamy Cilantro Dressing:
(makes about 1 cup of dressing)
1/4 cup white wine vinegar
1 tablespoon fresh lime juice
1/4 cup olive oil
1/2 cup plain Greek yogurt
2 teaspoons sugar
1/2 teaspoon dried cumin
1/2 teaspoon garlic powder
1/2 teaspoon dried oregano
1/4 teaspoon paprika
1/4 teaspoon Kosher salt
1/4 teaspoon black pepper
2 tablespoons fresh cilantro, minced

Salad Ingredients:
1 head chopped iceberg lettuce
10 oz grape tomatoes, halved
1 can (14 oz) chili beans, slightly drained
4 ears corn, grilled and kernels cut off the cob
Olive oil for brushing corn cobs
1/4 red onion, finely diced
3 cups grated sharp cheddar cheese
2 cups corn chips (like Fritos)

Directions:
1. Make the dressing. Prepare the cilantro by finely mincing for the dressing. Whisk together the vinegar, lime juice, olive oil, Greek yogurt and sugar together in a small jar until well combined. Add the spices and cilantro, and whisk or shake until emulsified.

2. Prep the veggies. Over direct heat, grill the corn (turning as needed) until char marks appear. About 15-20 minutes. Once the grilled corn has cooled slightly, carefully cut the kernels off from the cob with a sharp knife, or a corn stripping tool.

3. Meanwhile, wash and chop the lettuce. Finely dice the red onion and halve the grape tomatoes.

4. Assemble the salad. Toss all of the salad ingredients together with the dressing and then top the salad with the corn chips. Toss once more to incorporate the chips. Serve immediately!


French Toast Sticks

 
French-Toast-Sticks_v2_01.jpg

This week we are channeling our inner child with French toast sticks! The extra surface area achieved when preparing French toast sticks brings twice the flavor while enrobing wonderfully custardy insides. Their handy shape means they are destined for easy dipping, serving, and sharing with the whole family. Good Morning!

Cinnamon-Sugar French Toast Sticks
Serves 4

Ingredients:
1 large loaf bread (such as a brioche or Italian loaf that’s 3-4 days old)
3 eggs
3/4 cup heavy cream
1 teaspoon vanilla
1/4 teaspoon salt
1/2 teaspoon allspice
1/2 cup white sugar
1 tablespoon cinnamon
4 tablespoons salted butter, divided

For Serving:
Pure Maple syrup
Seasonal berries

Directions:
1. Trim the crust off of the bread and slice it into equally-sized strips, roughly 1" thick.

2. In a medium bowl, whisk together the eggs, cream, vanilla, salt, and allspice. Pour the mixture in a shallow bowl. In a small bowl, mix together the sugar and cinnamon. Spread the mixture out on a medium-sized plate.

3. Melt 2 tablespoons butter in a medium-large skillet.

4. Separate the bread sticks into two even batches. Starting with the first batch, dredge the bread sticks one at a time in the egg mixture by rolling them for a few seconds to evenly coat the bread all the way around. Shake off any excess egg mixture.

5. Place a few of the sticks of bread into the skillet, spacing them evenly, with about 1" in between (this spacing will make them easy to grab and turn). Cook the French toast sticks over medium-low heat using tongs to turn. Cook evenly until all sides are golden brown (roughly 1-2 minutes on each side).

6. Immediately remove the sticks from the pan and coat with the cinnamon and sugar while the French toast sticks are still hot, repeating until all of the sticks from the first batch are coated.

7. Melt the remaining 2 tablespoons of butter and repeat Steps 4-6 with the remaining sticks.

8. Once all the French toast sticks have been cooked and coated, serve immediately with warm maple syrup and fresh seasonal berries.


Chocolate Crêpe Cake

 
Chocolate-Crepe-Cake_V2_01a.jpg

We love the beautiful, layered presentation of a crêpe cake, and we love the flavor even more! Alternating layers of chocolate crêpe and vanilla custard stack together in an extremely impressive assembly. This not-too-sweet 'cake' is topped with fresh berries and whipped cream, and pairs perfectly with a cup of coffee. The only question is whether to serve it for breakfast for dessert. You decide! (Hint: we suggest both!)

Chocolate Crêpe Cake
Makes one 8-inch cake - Serves 8-10

Chocolate Crêpe Ingredients:
Makes about 30 (8-inch) crepes
12 eggs
5 cups whole milk
1/2 teaspoon Kosher salt
2/3 cup unsweetened cocoa powder
2/3 cup sugar
1 tablespoon vanilla extract
1 cup butter, melted
3 cups flour Canola oil for coating the cooking surface

Vanilla Custard Filling Ingredients:
Makes about 6 cups
2 cups whole milk
1 cup heavy cream
3 large eggs
3 large yolks
3/4 cup sugar
1/4 teaspoon Kosher salt
3 tablespoons cornstarch
1/2 tablespoon pure vanilla extract
6 tablespoons unsalted butter, cut into 1/2-inch cubes

Whipped Cream Topping Ingredients:
1 cup heavy whipping cream
1/4 cup powdered sugar
1 teaspoon vanilla extract

Garnishes:
Additional cocoa powder for dusting
Fresh raspberries
Fresh blackberries

Directions for Making the Crepes:
1. Prepare the crêpe batter: In a food processor or blender, mix the eggs, milk, Kosher salt, cocoa powder, sugar, and vanilla extract together. Blend thoroughly. Add the melted butter and blend again. Add the flour to the mixture and mix until just combined; do not over mix. The batter should be the consistency of heavy cream.

2. Allow the batter to sit for several hours or overnight in the refrigerator. This chilled resting period is key to forming a good batter.

3. When it’s time to make the crêpes, prepare a landing place for the finished crêpes by lining a plate with a layer of parchment paper. Prepare several pieces of parchment paper to place between the cooked crêpes.

4. Heat a crêpe pan or nonstick skillet over medium heat. Swipe the cooking surface with a canola oil-soaked paper towel. Pour 1/3 cup batter on to the hot skillet and immediately swirl the batter to coat the surface. The batter will quickly set and the top will become dry looking with little bubbles forming. Once you're able to loosen the edges of the crêpe and check the bottom for golden brownness; about 1-2 minutes, flip the crêpe and cook the other side for another 30 seconds - 1 minute. Remove the finished crêpe from the pan and place on a waiting plate. Repeat until all of the batter has been used, about 25-30 crêpes (not a thousand!).

5. Allow the crêpes to cool. Wrap the entire stack well, once cooled, to prevent drying out and to prevent odors from invading the flavor of the crêpes until ready to assemble the cake.

Directions for Making the Vanilla Custard:
1. In a large saucepan, heat the milk to scalding.

2. In a large bowl, whisk together the cream, eggs, egg yolks, sugar, salt, and cornstarch until smooth. If necessary, strain through a fine sieve. Stream in 1/2-cup of the hot milk while stirring continuously. Gradually add the remaining hot milk continuing to stir constantly. (This process, known as “tempering,” gradually increases the temperature of the mixture without curdling the eggs and egg yolks.)

3. Pour the mixture back into the same large saucepan used to heat the milk and cook over medium-low heat, stirring constantly until the mixture thickens to a thin custardy consistency (it will continue to thicken as it cools). Remove from the heat.

4. Add the vanilla extract and cubes of butter. Stir until the butter is melted and combined into the mixture. Set the mixture aside to cool to room temperature. Place a piece of plastic wrap on the surface of the pastry cream to prevent the formation of a “skin.” Store in the refrigerator until ready to assemble the crêpe cake.

Directions for Assembling and Finishing the Crêpe Cake:
1. Smear a teaspoon of the vanilla custard filling in a circle on the bottom of the presentation plate. This will help to steady the final stack of crêpes.

2. Place a crêpe, centered, on the plate. Spread about 2-3 tablespoons of the vanilla filling on top and spread in a thin, even layer. Repeat the sequence of alternating layers until all the crêpes are stacked finishing with a crêpe.

3. Wrap the cake well to prevent drying out and to deter any odors in the refrigerator transferring to the dessert. Chill the assembled cake for 4 hours or overnight.

4. Just prior to serving, whisk the heavy whipping cream, powdered sugar, and vanilla extract, until the sugar is dissolved. Whip the mixture to stiff peaks. Use a piping bag and star tip, pipe the whipped cream on top of the gâteau in an interesting design of your choice. Garnish with fresh berries.

5. To serve, cut narrow wedges of the crêpe cake with a long knife. Lay each slice on its side on an individual dessert plate to display the thin layers. Serve with extra whipped cream and berries.


White Cheddar Pimento Deviled Eggs

 
Pimento-Deviled-Eggs_V2_01.jpg

Do you love, or even crave deviled eggs? Some quick egg math: How is it possible that we can only eat one, maybe two fried eggs, but can easily consume an entire plate of deviled eggs (one plate = roughly twelve eggs)? In one sitting? No _problem? That answer is best left up to others! All we have to say is that this recipe makes 24 halved eggs, so it ultimately serves?.?.?.? two. Enjoy!

White Cheddar Pimento Deviled Eggs
Makes 24 filled halves

Ingredients:
12 hard-boiled eggs
3/4 cup mayonnaise
2 tablespoons Dijon mustard
1 (4 oz) jar finely diced pimento peppers, drained
1/2 teaspoon Worcestershire sauce
1-1/2 cups finely grated sharp white cheddar cheese
1 tablespoon minced shallot
1 teaspoon salt
1/2 teaspoon sugar
1/4 teaspoon garlic powder
1/4 teaspoon onion powder
1/4 teaspoon cayenne

Garnishes:
Paprika
Black pepper
Chives, chopped

Directions:
1. Place the cold eggs in a large saucepan and add cold water, enough to cover the eggs by at least 1-inch.

2. Bring the water and eggs to a boil over high heat. Once the water boils, cover the eggs with a lid and remove from the heat. Let the eggs stand for 12 minutes – set the timer! (Be careful not to go over 12 minutes. It’s the extended exposure to heat that turns the yolks green.)

3. After the 12 minutes are completed, pour out the hot water and replace with cold water. As the cold water warms from the eggs, replace with more cold water. Once cooled, the eggs are ready to use, or may be refrigerated.

4. Carefully peel the eggs. Slice the eggs lengthwise, and carefully remove the yolks, placing them in a medium-sized mixing bowl.

5. Use a pastry blender or fork to quickly mash the yolks. Continue mashing the yokes with a fork until they have completely broken apart. (For ultra-smooth yolks, grate the yolks on a fine grater.)

6. Mix in the mayonnaise, Dijon mustard, pimento peppers, Worcestershire sauce, cheddar cheese, shallot, salt, sugar, garlic powder, onion powder, and cayenne into the yolks and continue to combine until evenly incorporated.

7. Pipe the filling into the egg halves with a pastry bag outfitted with a wide tip, or a plastic bag with a corner snipped away. Garnish the eggs with paprika, black pepper, and chives.


Wilted Spinach Salad

 
Wilted-Spinach-Salad_V2_01.jpg

It's time to enjoy spring greens! Learn how to make the perfect soft-boiled egg and maximize your salad making skills with our take on a classic wilted spinach salad. Jammy eggs, crispy bacon, and wilted spinach come together with creamy goat cheese, crunchy breadcrumbs, and a tangy, fresh, warm dressing. Delicious!

Wilted Spinach Salad with a Perfect Soft-Boiled Egg
Makes 4 salads

Ingredients:
For the Breadcrumbs:

2 tablespoons butter
1 cup hearty (and slightly stale) bread, pulsed into breadcrumbs
1/4 teaspoon Kosher salt
1/4 teaspoon black pepper

For the Salad:
1/2 lb. bacon, fried and crumbled
4 eggs, soft-boiled and halved
2 lbs. fresh spinach or baby spinach
1/2 small shallot, thinly sliced
4 oz. goat cheese, crumbled into bite-sized pieces

For the Warm Bacon Dressing:
2 tablespoons reserved bacon fat
2 tablespoons olive oil
2 tablespoons apple cider vinegar
1 tablespoon fresh lemon juice
2 teaspoons Dijon mustard
1 teaspoon honey
1/4 teaspoon Kosher salt
1/4 teaspoon black pepper

Directions:
1. Prepare the Breadcrumbs: Making your own breadcrumbs is a snap! Toss a few slices of stale bread in a food processor and pulse into a fine texture. Spread the crumbs in a single layer on a sheet pan and and pop into a 300 degree oven for 10 minutes or until lightly toasted. (Watch carefully.) Once cooled, they're ready to use on salads or casseroles.

2. In a large skillet, melt the butter and toss with the breadcrumbs. Over medium heat, stir the breadcrumbs often and toast until golden brown. Season with Kosher salt and pepper. Remove from the pan and set aside.

3. Prepare the Bacon: In the same skillet, fry the bacon until crispy. Remove the bacon, and let cool on a paper towel-lined plate. Crumble. Reserve 2 tablespoons of the bacon grease for the dressing.

4. Prepare the Dressing: In a small saucepan, combine the rendered bacon fat with the olive oil, vinegar, lemon juice, Dijon mustard, honey, salt, and pepper. Heat the dressing until just warmed.

5. Prepare the Soft-boiled Eggs: Bring a saucepan filled halfway with water to boil. Add the eggs and boil for exactly six minutes. Remove immediately from the boiling water and cool slightly by running under cold water for about a minute. Peel and halve the eggs. Soft boiled eggs may be made ahead of time and kept in their shells and in the fridge for up to two days. To reheat, drop the pre-cooked eggs into boiling water for three minutes. Cool slightly, peel, and serve!

6. Assemble and Serve the Salad: Just before the eggs finish boiling, toss the spinach with the bacon crumbles, shallot, and the warm bacon dressing. Toss with tongs until the spinach begins to wilt slightly. Plate each dish with a serving of wilted spinach, one soft-boiled egg cut in half, a few crumbles of goat cheese, and a generous sprinkle of toasted breadcrumbs. Serve immediately and enjoy!


Easy Pasta Dinners from the Pantry

 
1Pasta2020_v2_01 copy.jpg

A good pasta dish transforms everyday, pantry ingredients into something extraordinary for any day of the week. IN THIS ISSUE, we present three of our easiest to implement pasta dishes that deliver big on flavor and satisfaction! Buon appetito!


A Good Time to Have Brunch In!

 
Brunch2020_v3_01.jpg

There is no better time than the present to brunch . . . IN! If breakfast is the most important meal of the day, brunch is the most fun! Brunch implies a leisurely sort of day — where our schedules are less relentless and time together is well spent. Whether you spend it with family or a few good friends, we've composed a foolproof menu worth celebrating.

IN THIS ISSUE, we feature a Caramelized Onion, Mushroom, and Parmesan Quiche, Macerated Citrus Salad, and a side of Orange Poppyseed Bread.

 
Source: A Good Time to Have Brunch In!

Enjoy Bagels and Cream Cheese at a New Level!

 
Bagels2020_v3_01.jpg

Spaghetti and meatballs, Cookies and milk. Bagels and cream cheese. These undeniable pairings are a fact of life, and one we celebrate. On average, Americans consume roughly five million bagels a day. And we're not mad about it. Warm, chewy bagels slathered with tangy cream cheese is our idea of a wonderful breakfast, lunch, or dinner.

IN THIS ISSUE, we share the how-to for making delicious bagels at home, plus homemade cream cheese along with a few flavor variations, one savory, one sweet.

 
Source: Enjoy Bagels and Cream Cheese at a New ...

Three Fresh Takes on Spring Asparagus!

 
Asparagus2020_v1_01.jpg

People mark time in different ways, the alignment of the stars, the phase of the moon, or what flowers are blooming in the garden. For us, it's what fresh vegetables and fruits are making their first seasonal appearance in the markets, and nothing says "spring" like asparagus!

IN THIS ISSUE, we feature asparagus by preparing it in three enticing salads. These recipes are perfect for starting the cascade of fresh produce during the season ahead.


A Modern Makeover for Casseroles

 
Modern_Makeover_Casseroles.jpg

Sensible and hearty, casseroles are a great answer to "what's for supper?" IN THIS ISSUE, you'll find several great recipes: a sweet and savory Apple & Bacon Mac ‘n Cheese, a ground beef version of Shepherd’s Pie, and finally, a delicious Chicken & Brown Rice Broccoli Bake - delicious!


For the Love of Chocolate! Our Best Brownies


Love appears in our lives in many ways every day of the year, but it's fun to acknowledge and celebrate our affections with a day dedicated to those that are special in our lives. Some mark the occasion with cards or flowers, however, we think homemade sweets say it best! IN THIS ISSUE, we're celebrating with Classic Cocoa Brownies, our Best Ever Blondies (which are loaded up with goodies!), and Walnut Brownie Cupcakes. Let's get baking!


Super Snacks! Three Mediterranean Dips

 
Med_Dips_v1_01.jpg

These Mediterranean dips are perfect for a healthy snack, light meal, or a game time party! IN THIS ISSUE, we feature three easy dips made to share - a very creamy classic hummus, a rich, roasted red pepper and walnut dip called Muhammara, and a smoky Baba Ganoush. Time to kick off a little delicious dipping!


Build a Healthy Meal with Dinner Bowls

 
DinnerBowl2020_v1_01.jpg

Loaded with more energizing goodies than a traditional salad, the trend of "healthy bowls" is a delicious and filling answer to "what's for dinner?" We like to carefully prepare our ingredients, and arrange them artfully in little clusters for curated bites of tasty awesomeness. IN THIS ISSUE, we present three super healthy recipes featuring an array of vegetables, protein sources, whole grains, and very flavorful dressings. Cheers to a healthy and wholesome New Year!


Entertain with these Easy Appetizers!

 
Appetizers_v1_01.jpg

YOU'RE IN THE MOOD FOR A PARTY -- WE ARE, TOO! We love this season because it is filled with family and friends, and plenty of good times. Whether you're the party host, or bringing something to a get-together, this issue features three easy appetizer recipes - all delicious!
Our Best to You this Festive Season!


A Festive Holiday Dinner Menu!


THE HOLIDAY SEASON CALLS FOR MANY GATHERINGS OF FAMILY AND FRIENDS AROUND DELICIOUS FOOD. IN THIS ISSUE, we feature four recipes that make a perfect menu for a special, festive gathering. The meal begins with a Roasted Beet Salad, showcases two stunning side dishes, Haricots Verts with Tarragon Butter, and Golden Melting Potato Medallions, and features a perfectly roasted Beef Tenderloin with Red Wine Shallot Sauce as the entree. Happy Holidays to You and Yours!


Make Holiday Gifts from your Kitchen!

 
Gifts_v2_01.jpg

We think giving is just as fun as receiving, and tis' the season for giving abundantly!

IN THIS ISSUE, we're sharing a few simple gifts from the kitchen that you can make in one evening and give throughout the holiday season. Enjoy making and gifting these recipes: Gingersnap Cookie Butter, Peppermint Bark, and/or Easy Chocolate and Peanut Butter Fudge.


Save Room for Pie! Thanksgiving Classics with a Twist


Happy Thanksgiving! This special holiday is centered around gratefulness, family, friends, and of course delicious food! IN THIS ISSUE, we offer a few tips for mastering the most important part of the dinner - the pie! In this season of thanks, we'd like to extend our gratitude to you for your loyalty and for being the most important part of our business!


Delicious Holiday Sides to Audition Now!

 
Sides_v1_01.jpg

As each holiday season approaches, we like to plan a few new recipes into the mix for the many upcoming gatherings. IN THIS ISSUE, we feature a snappy green bean dish complete with two favorite ingredients - bourbon and bacon, a satisfying artichoke gratin, and a roastedBrussels sprouts side dish accented with a drizzle of balsamic Dijon reduction. Try and practice a few of them now. We think these dishes will make your shortlist of holiday favorites, too!